A New First Impression
Your home’s entrance is more than just a place to take off your boots — it’s the space that sets the tone for everything that follows. It should feel welcoming, durable, and designed for real life in Northern Ontario. This project shows how attention to detail, proper materials, and professional planning can completely transform an entryway that once struggled with wear, moisture, and style into a durable, modern, and low-maintenance space.
At North Bay Home Renovations, we believe that great floors start long before the first tile is laid. From selecting the right underlayment to choosing grout that will withstand years of foot traffic, every step matters. This transformation highlights what “built right from the ground up” really looks like — and why homeowners across North Bay continue to trust our Red Seal-endorsed team for flooring projects of all sizes.
Step 1: Assessing the Space and the Problem
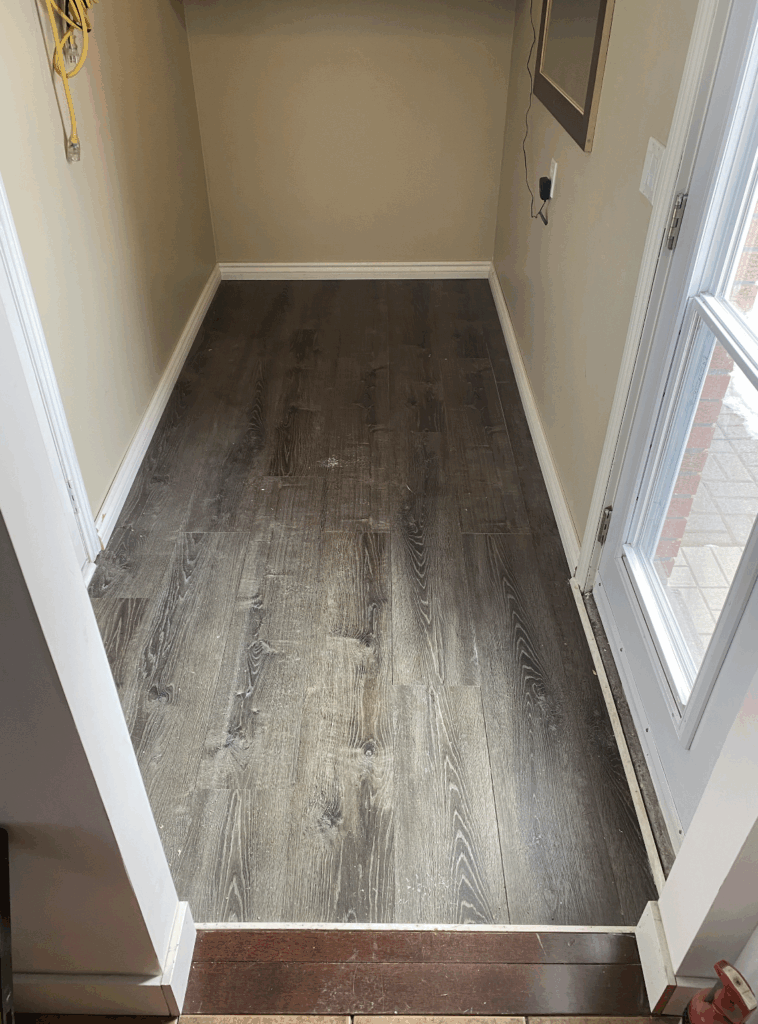
Before we ever picked up a pry bar, we evaluated the existing conditions. The entrance originally featured a dark laminate plank floor that had begun to lift and separate at the joints. It looked tired, but more importantly, it wasn’t designed to handle the heavy moisture load of an entrance that opens directly to the outdoors.
Laminate flooring, while beautiful in many living spaces, isn’t ideal for entryways where melting snow, sand, and rain can seep beneath the planks. Over time, this causes swelling, buckling, and warping. Our inspection confirmed that although the subfloor was structurally sound, it needed a proper moisture barrier and a more durable surface material.
We also considered aesthetics: the homeowner wanted something timeless, easy to clean, and capable of hiding the inevitable slush and salt marks that come with North Bay winters. Porcelain tile, with its combination of strength, texture, and design versatility, checked all the boxes.
Step 2: The Tear-Out
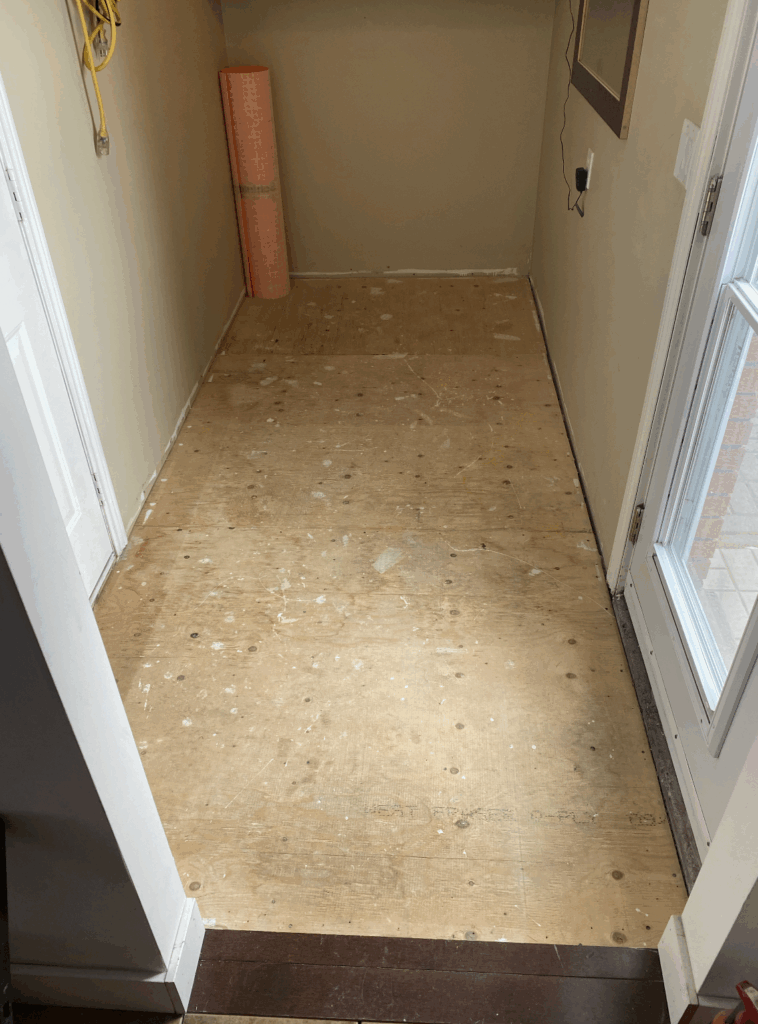
Demolition day is when the transformation truly begins. We carefully removed the laminate and underlayment, exposing the original plywood subfloor. Every screw, staple, and old adhesive spot was cleared away to ensure a smooth, level base for the new installation.
This stage is critical — a floor is only as good as what lies beneath it. We always take the time to tighten loose fasteners, check for soft spots, and repair any damage. Even minor inconsistencies in the subfloor can lead to cracked grout lines or uneven tiles later.
Step 3: Subfloor Reinforcement and Preparation
After confirming the subfloor was sound, we cleaned, vacuumed, and marked layout lines to plan our tile pattern and movement joints. Before tiling, we installed Schluter®-DITRA, a premium uncoupling and waterproofing membrane.
Why DITRA Matters
DITRA serves three essential purposes:
Prevents Cracking: The uncoupling layer absorbs minor movements in the subfloor, so the tile and grout above don’t crack.
Adds Waterproof Protection: Perfect for entryways, bathrooms, or basements, the membrane forms a watertight layer.
Improves Bonding: Its grid-pattern design allows thin-set mortar to lock securely, creating a strong bond without direct stress transfer.
Installing DITRA requires precision — thin-set mortar is applied evenly, and the membrane is pressed in with a roller or float to eliminate air pockets. Once cured, it’s ready for tile.
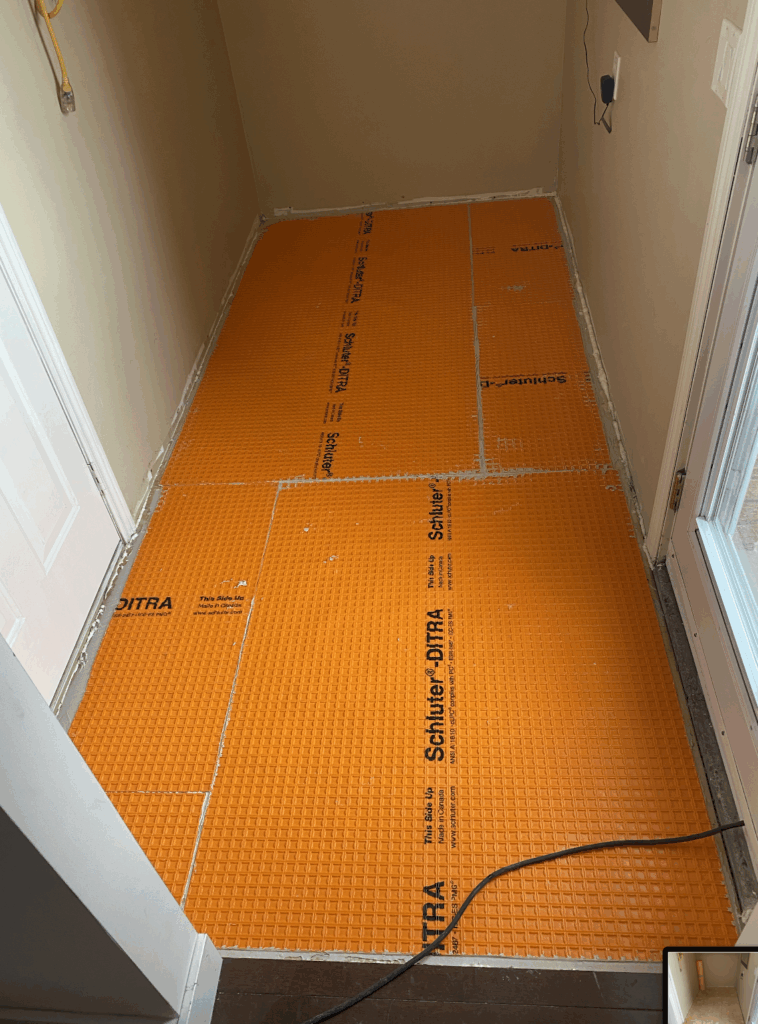
At this stage, the foundation for long-term success was complete. The vibrant orange layer might not stay visible, but it ensures the tile above will perform beautifully for decades.
Step 4: Choosing the Perfect Tile
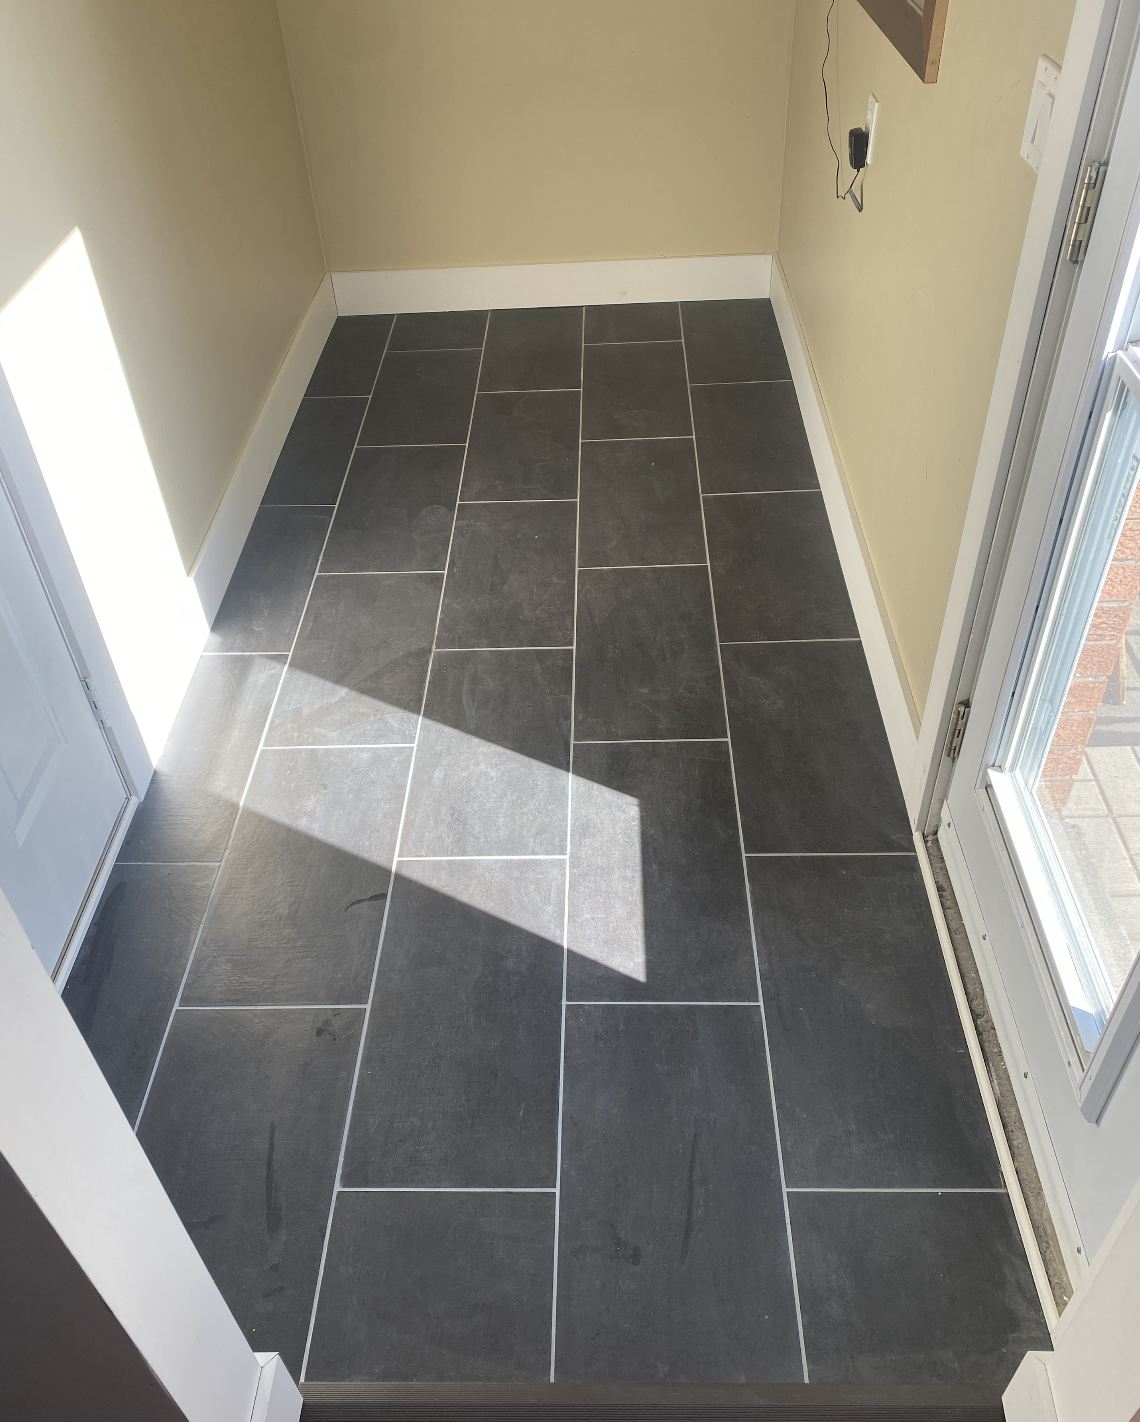
Selecting tile is both a technical and a creative decision. We worked with the homeowner to choose a large-format dark slate-look porcelain tile, offering a natural stone aesthetic without the maintenance hassles.
Porcelain is denser and less porous than ceramic, making it ideal for entrances, kitchens, and bathrooms. It’s resistant to stains, scratches, and moisture — and when combined with high-quality grout, it’s nearly impervious to water.
The large tiles (12 × 24 inches) also created an elongated appearance, visually widening the narrow entrance. Paired with a subtle gray grout, the finished look would be both modern and forgiving to daily wear.
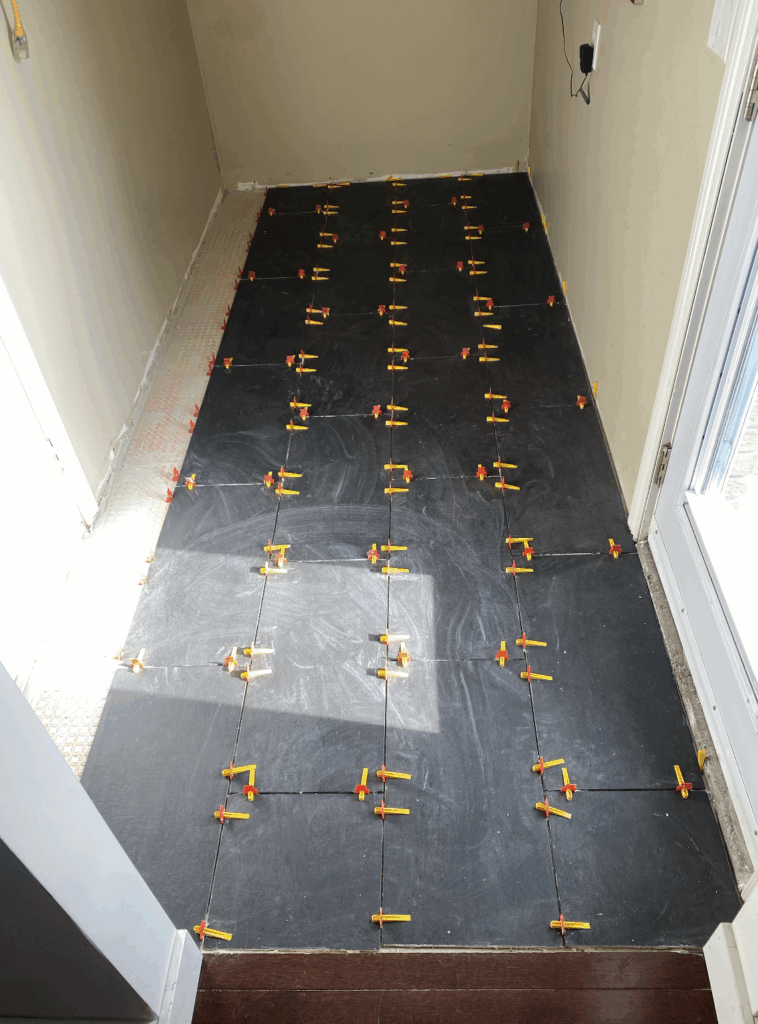
Step 5: Dry Layout and Levelling System Setup
Before adhering anything permanently, we completed a dry layout — spacing the tiles, testing alignment, and confirming that cuts at the edges would look balanced. Proper planning prevents awkward slivers or uneven joints once installation begins.
To achieve a perfectly flat surface, we used a tile levelling system with clips and wedges. This system locks tiles in place as the thin-set cures, eliminating “lippage,” where one tile edge sits slightly higher than another. It’s an extra step that makes a world of difference in both look and feel.
Step 6: Setting the Tile
Each tile was set in premium polymer-modified thin-set mortar over the DITRA membrane. We worked systematically, spreading mortar evenly with the proper notched trowel, ensuring full coverage for maximum adhesion.
For consistent spacing, 1/8-inch joints were maintained throughout. The level-clip system kept everything aligned and allowed us to achieve razor-straight grout lines — a signature of our workmanship.
Once the tiles were placed, we allowed the floor to cure undisturbed overnight. Rushing this stage can lead to movement or uneven bonding, so patience here is part of professional best practice.
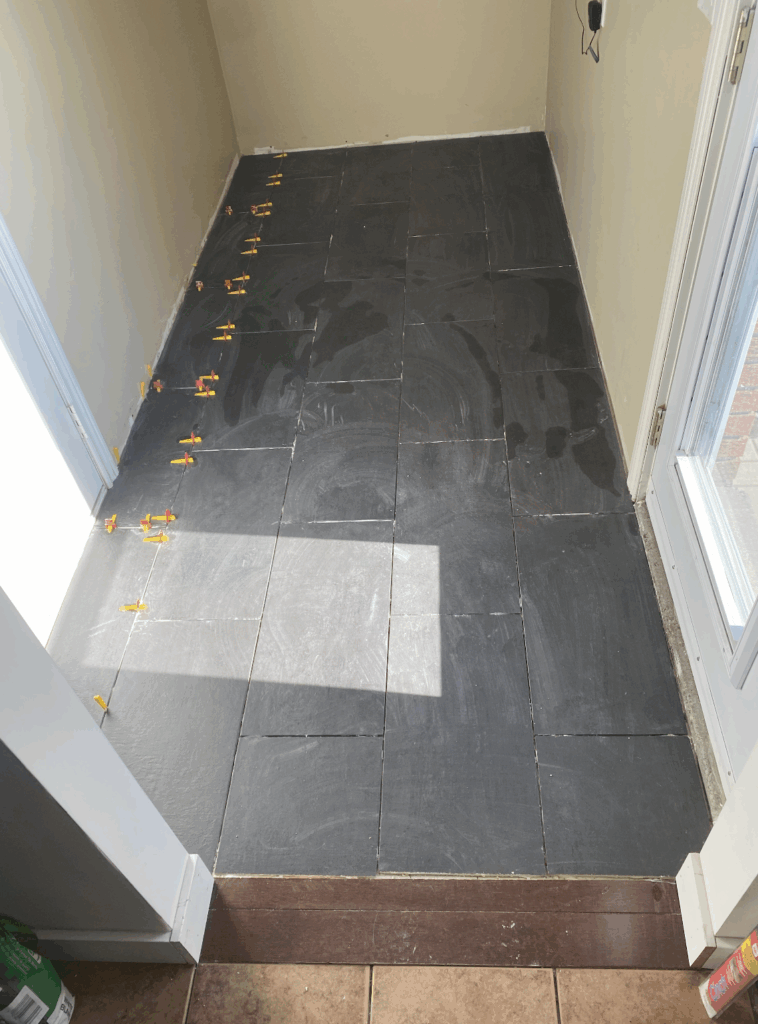
Step 7: Grouting and Detailing
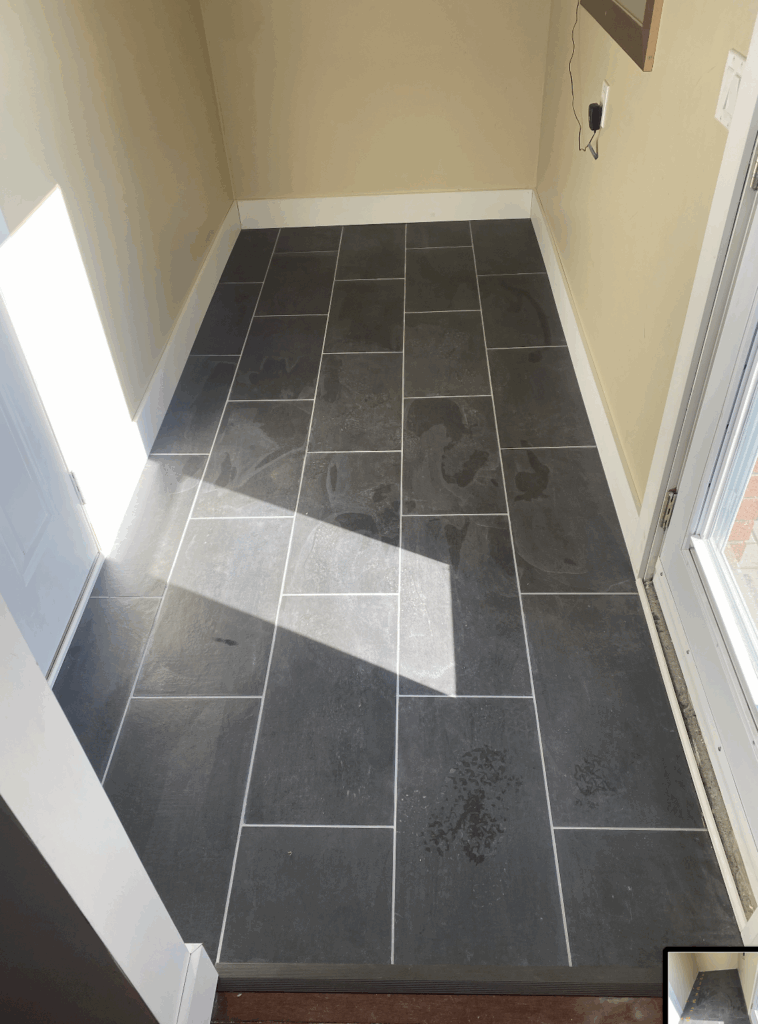
After 24 hours, the leveling clips were removed and grout lines cleaned thoroughly. We then applied a premium light-gray grout, chosen to accentuate the dark slate pattern while hiding daily dust.
Grouting transforms a tile project from “in progress” to “complete.” The contrast between the gray grout and deep-charcoal tile added definition and a subtle, contemporary style.
Once the grout cured, we sealed the surface for extra protection — especially useful in entryways where road salt and grit can be harsh on grout over time.
Step 8: Finishing Touches
With the tile complete, we installed new trim, cleaned all edges, and added a sleek threshold transition between the new tile and the adjacent hardwood. This final detail ensures a smooth step between flooring types while protecting edges from chipping.
The result? A bright, modern, and durable entrance floor that instantly elevated the look of the home.
Beyond One Room: Why Professional Flooring Installation Matters
While this project focused on a small entranceway, the process illustrates our approach to all flooring work. The same level of precision applies to kitchens, bathrooms, basements, and open-concept living spaces. Here’s what sets North Bay Home Renovations apart:
1. Red Seal-Endorsed Craftsmanship
Our team is led by a Red Seal-endorsed carpenter — meaning your floors are installed to national trade standards. Every cut, seam, and transition is made with accuracy, ensuring both longevity and aesthetic excellence.
2. WSIB & Licensed Professionals
We are fully insured, WSIB registered, and licensed to operate in Ontario. Homeowners can rest easy knowing that every project is compliant with building codes and safety regulations.
3. Transparent Pricing
Every flooring quote includes a detailed, line-item breakdown — from material allowances to underlayment and trim. No surprises, no hidden fees, just honest pricing.
4. Permit-Ready & Compliant
For larger renovations that tie into structural or electrical work, we handle all drawings, permits, and inspections — keeping your renovation legal, smooth, and stress-free.
5. Two-Year Labour Warranty
We stand behind our work. Every flooring installation includes a two-year labour warranty, giving you peace of mind long after the job is done.
Types of Flooring We Install
At North Bay Home Renovations, we offer more than just tile. Each type of flooring brings unique strengths and design appeal.
Porcelain & Ceramic Tile
- Ideal for kitchens, bathrooms, and entrances
- Moisture-resistant and low-maintenance
- Countless designs, textures, and grout options
Luxury Vinyl Plank (LVP) & Luxury Vinyl Tile (LVT)
- Great for basements and open-concept spaces
- Provides a wood or stone look with added comfort underfoot
- Durable and water-resistant, perfect for family homes
Laminate Flooring
- Affordable and attractive, ideal for bedrooms or offices
- Scratch-resistant finishes and quick installation
- Best for low-moisture interior rooms
Heated Floors
- Combine with tile or engineered flooring
- Even heat distribution and energy efficiency
- Ideal for basements, bathrooms, and foyers
Our approach to every flooring type is the same: professional preparation, high-quality materials, and meticulous installation.
Understanding the Process: Why Every Step Matters
Some homeowners are surprised to learn how much goes into a quality flooring project. Here’s a quick breakdown of the essential stages and why cutting corners can cost you more later.
- Assessment & Planning: Confirming subfloor condition prevents failures.
- Demolition: Proper removal keeps your base level and clean.
- Underlayment: Protects against moisture and movement.
- Layout: Ensures balanced patterns and efficient material use.
- Installation: Correct mortar choice and coverage are key to durability.
- Grouting & Sealing: Locks out dirt and moisture while enhancing style.
- Trim & Transitions: Finishes the job with precision and visual continuity.
Every step, from prep to polish, determines how your floor will perform over time — which is why professional installation is worth the investment.
The North Bay Advantage: Built for Local Conditions
North Bay’s four-season climate can be tough on floors. Cold winters, spring moisture, and fluctuating humidity levels test every material. We install with those realities in mind:
- Expansion gaps are calculated precisely for temperature swings.
- Moisture barriers prevent swelling and cupping.
- Tile underlayments like DITRA absorb movement and thermal stress.
- Sealants & grouts are chosen for freeze-thaw resilience.
We understand not just how to make a floor look good, but how to make it last in Northern Ontario conditions.
Why Homeowners Choose North Bay Home Renovations
- Local Expertise: We’ve served the North Bay area since 2018, earning trust through word-of-mouth and repeat clients.
- Complete Project Management: From design and material selection to cleanup and disposal, we handle everything.
- Home Depot PRO & Chamber of Commerce Member: Our affiliations reflect our professionalism and commitment to community standards.
- Customer Satisfaction: Our reviews highlight reliability, punctuality, and meticulous attention to detail.
Whether we’re transforming an entryway, kitchen, or basement, our goal is the same — to deliver workmanship that reflects both beauty and integrity.
Real-World Impact: A Floor That Works as Hard as You Do
This finished entrance isn’t just a cosmetic upgrade; it’s a functional improvement. The porcelain tile will resist scratches from boots and pet claws, handle melting snow without swelling, and maintain its polished look for years.
Cleaning is as simple as a damp mop — no special treatments required. The homeowner now enjoys a space that feels brighter, cleaner, and instantly more upscale every time they walk through the door.
Lessons from This Project
- Don’t Skip the Prep: The hidden layers — subfloor repair, waterproofing membrane, and leveling — determine long-term success.
- Match Material to Purpose: Entryways demand water-resistant materials. Tile, vinyl, or engineered options outperform laminate in these zones.
- Professional Installation Pays Off: Precision work eliminates future repairs and ensures seamless transitions between materials.
- Invest in Quality: A slightly higher upfront cost saves thousands in future maintenance.
Beyond Flooring: Full-Service Renovations
While flooring is a cornerstone of our work, North Bay Home Renovations also specializes in:
- Custom Decks & Fences: Red Seal carpentry with laser-straight lines and long-lasting finishes.
- Kitchen & Bathroom Renovations: Waterproofing, cabinetry, lighting, and tile installation.
- Additions & Garages: Permit-ready builds that expand your space while maintaining structural integrity.
- Outdoor Living Spaces: Gazebos, pergolas, saunas, and covered porches built to handle Northern Ontario’s seasons.
Every service is backed by the same commitment to craftsmanship, transparency, and compliance.
Built Right, Every Time
The transformation of this entranceway is a testament to our company’s core philosophy – do it once, do it right. What started as an outdated laminate floor is now a durable, elegant, and practical tiled space that will stand up to everyday use for decades.
We take pride in every stage of our process — from subfloor prep to grout cleanup — because we know homeowners are trusting us with the spaces that matter most.
Ready to Transform Your Floors?
If you’ve been thinking about updating your flooring, now’s the perfect time to start planning. Whether it’s tile, vinyl, or engineered wood, we’ll help you choose materials that fit your lifestyle, budget, and aesthetic.
Contact North Bay Home Renovations today to schedule your free in-home estimate or call us at 249-506-0557. Let’s design a floor that feels as good as it looks — and is built to last.